No products in the cart.
Having a good workflow in product photography will save you much time and guarantee the outcome will be pretty much similar of quality. In my opinion, we can divide the procedure of each product shooting project into three main phases(I use the my Valentine shot as an example):
1. Idea planning, and preparing: This is where everything else will follow. Firstly, the idea should come about the shot. I divide the planning into two objects: Foreground and Background. While, the foreground is where our main subject is represented, the Background is the support element to reveal and adding stronger effect for main subject. I suggest answering the following questions for this phase:
– What’s the mood for this shot ?(Energetic, romantic, elegant…)
– What’re props we can use together with the main subject to achieve the sense(mood) ?
– What’re the characteristics of the product, where the brand name is marked?
– With food, what’re the characteristics of the dish ? To which culture the food belong ?
a- Foreground: With this shot, I want a warm, lovely and romantic sense (suitable for Valentine). I visit some supermarkets and finally found some heart-shape sweets, fantastic, here we go. Due to the bright tone of sweets, I picked props with opposite tone(dark) to make the sweet standout. I also want to use some candles from the behind to create a warm tone for the shot. The idea came to my mind with a hot coffee cup warmed by a candle.
b- Background: We usually use a gradient or blank(solid color) background in product shots. I, however, want to create some backgrounds with a bit more complex to make the whole scence more interesting and creative. So for this type of romantic shot, sparkling bokeh might be ok. I create these bokeh by Christmas lights. Initially, the idea with heart-shape bokeh might be great but I realized that it can be something distract viewers.
To have better imagination, we can figure out on paper. This is the sketch of my shot

2. Lighting setup and shooting: The mission in this phase is showing all the characteristics of the product including materials, glossy(shiny) or not, brand name, main elements of the product and guarantee no element is hidden in the shadow. There should be some gradient (highlight and shadow) on the surface of the product or in some where else, the gradient areas will give more professional look to the shot. The best process for most photographers is try to test with each lighting scenario, light by light, take a shot, review, make some change in lighting setup and do it again again until we get what we want.
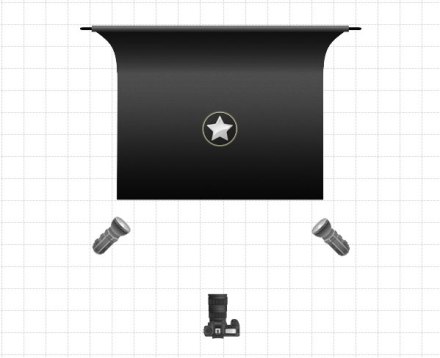
I started with the most basic(obvious) lighting setup:

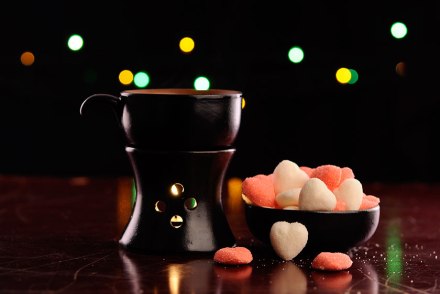
The result came out:

For this shot, tons of things should be improved. First, the cup does not look nice, especially its edges. They are too dark and cannot distinguish from background. Second, the lighting on the sweets is flat. To improve it, I put two lights behind the cup to get the rim light for edges as the following setup:

The result was:

Now all edges are ok but the foreground is too dark, so we need another light source in front. The following lighting setup came:

In my case, I used another light in front but we also have another solution as below:

Placing two reflectors in front of products also can bring light to the foreground.
The result is showed below:

Look good ? No. If you look into it carefully, you will notice some dark areas of the handle of the cup. To make it illuminated, I place a reflector on top of the cup to get some light back. Finally, the shot came out:

The overall look now is ok, the shape of object is well defined, light on sweets have shape and depth. Now, we go for the final phase
3- Post processing: In this phase, we use PS to clean out all dust and any imperfection of the product. A bit vignette might be helpful to focus the view, balance the composition, remove unwanted bokeh, make some more…
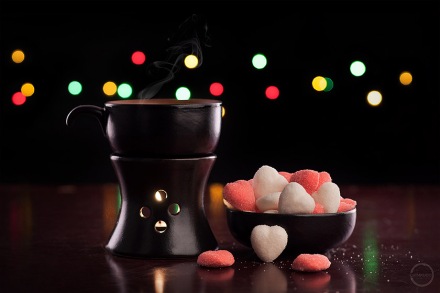
Finally, I came with the result:

To sum up, the procedure of my product project includes three phases: Idea planning, lighting setup and shot, post-processing. By improving by each shot, gradually we can achieve better and better results.
Happy shooting, my friends !
– chimkudo product photography –


0 responses on "Product photography project workflow"